Getting Started with Pre-Audit
- 05 Jan 2024
- 2 Minutes to read
- DarkLight
Getting Started with Pre-Audit
- Updated on 05 Jan 2024
- 2 Minutes to read
- DarkLight
Article Summary
Share feedback
Thanks for sharing your feedback!
Summary
In this article, we'll walk through what Jornaya Pre-Audit is and all of the steps for utilizing Jornaya's Pre-Audit.
What is Jornaya Pre-Audit?
Pre-Audit is a simple API call to the Jornaya platform, giving you real-time access to a lead buyer’s Audit Profile. This allows you to identify whether your lead will be given a “Green”, “Yellow”, or “Red” flag based on a buyer’s Audit Profile. You should work directly with the owner of that Audit Profile to understand the actions that will be taken based on this result.
Step 1: Connect with the Buyer and Validate Permissions
- Verify permission
- Contact your buyer to verify you have permission to pre-audit the LeadiD tokens sent to them if you were not asked to do so.
- Confirm your connection to your buyer
- Email support@jornaya.com with their name and request permission to pre-audit them. Please provide any proof from the buyer that you have their consent to do so.
- Jornaya will validate and set permissions, as well as provide you the Entity code to be used in the 'lec' parameter of the query string.
Step 2: API Set-Up
Within the Jornaya Member Portal, go to the Pre-Audit tab > API Instructions. Build the Pre-Audit API request string using the parameters in these instructions and you can reference the full Pre-Audit API specifications here. For reference, below is a sample of the Pre-Audit API structure.
For reference please see the full Pre-Audit API spec that lists the expected responses.
Example Request Structure (GET method)
https://api.leadid.com/SinglePreAudit?lac={ACCOUNTCODE}&id={LEADIDTOKEN}&lec={ENTITYCODE}&data={DATA}
Parameter Definitions
| Name | Value | Required | Description |
| URL | https://api.leadid.com/SinglePreAudit | Yes | The URL to be used for the query. |
| Method | GET or POST | Yes | The HTTPS method to be used. |
| lac | xxxxxxxx-xxxx-xxxx-xxxx | Yes | Your Jornaya Account Code. |
| id | 36 Character LeadiD token | Yes | The LeadiD token. |
| lec | xxxxxxxx-xxxx-xxxx-xxxx | Yes | The Entity Code of the party to whom you plan to sell the lead. |
| lpc | Alphanumeric string | No | A value that identifies the Provider from whom you received this lead. |
| data | Pipe | Separated Data with field data labels delimited by semicolons. e.g., email;joe@smith.com|f_name;joe | No | The data for which you want to determine Data Integrity. Note: a list of Data Integrity Field Data Labels can be found at the end of this document. |
| format | json, xml | No | The format in which you would like the data returned. The default value is JSON. |
Step 3: Test
Receiving a Successful Response:
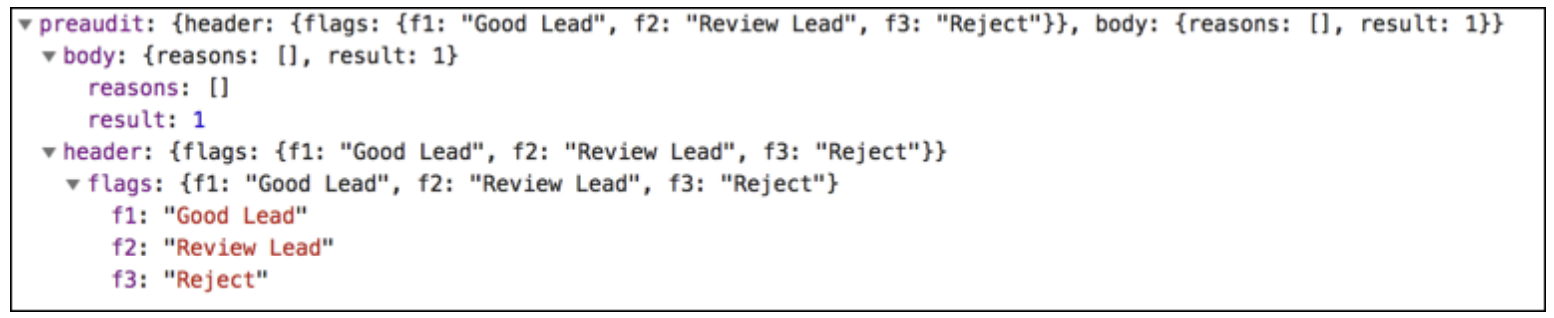
Enter a LeadiD token into the query and confirm you are receiving a successful response where the "result" field in the body is a "1" or Green.
Successful Response Example:
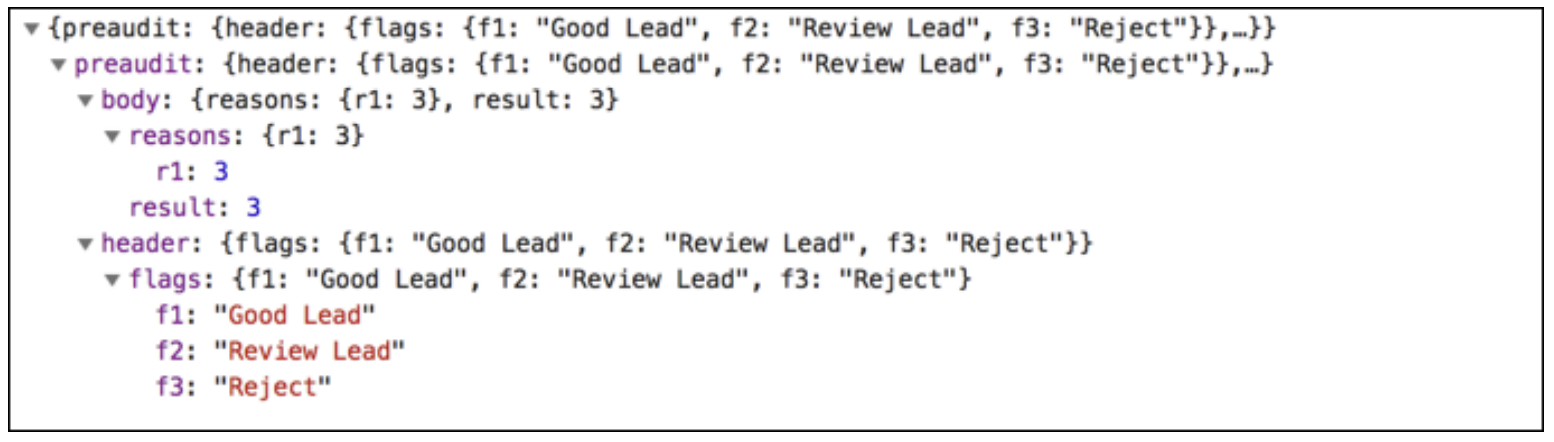
The result field is NOT 1
Review the "r" reasons in conjunction with the Pre-Audit API specifications page to determine the issue. If you're unsure how to resolve it please contact support at support@jornaya.com.
Example: Using the screenshot below you can see an "r1" reason was returned. When looking this up in the API spec you can see this is related to a token that is not authentic.
Common Error Responses:
- Connection Not Enabled:
error: {code:403, message: Permission denied}
Permission Error
If you receive the Permission denied error, please refer to Step 1 to make sure that you have connected with the Jornaya support team to have permissions validated and enabled.
- Inauthentic LeadiD Token:
What's Next?
Contact the support team at support@jornaya.com with any questions about your responses or to confirm your query is correct. Then let your buyer know you're all set to pre-audit tokens.
Was this article helpful?